Feeds:
Posts
Comments
ho·lis·tic
/hōˈlistik/
adjective
  1. Philosophy
    characterized by comprehension of the parts of something as intimately interconnected and explicable only by reference to the whole.
    • Medicine
      characterized by the treatment of the whole person, taking into account mental and social factors, rather than just the symptoms of a disease.
In the Beginning
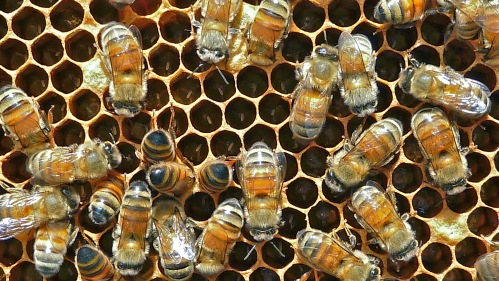
   Every successful beekeeper eventually decides what management protocol is right for their apiary. It is never ending. What we first believe as newbies naturally evolves over years as we gain experience. When I started this blog as a 1st year beekeeper in 2008, I added the byline, “Raising bees holistically in New Hampshire”. At the time, I believed “holistically” meant “treatment-free”. My goal was to develop better honey bee genetics by developing queens raised without the intervention of harsh chemicals – or for that matter, ANY chemicals.
   As an organic gardener for 20+ years, this was a philosophical choice,  tho’ also a response to the beginning beekeeper class I was taking that followed a popular book that basically was all about prophylactic use of hard chemical treatments regardless if the bees showed any symptoms of disease. Back then, it was what was taught as the standard.  To me tho’, it seemed  I was being taught the equivalent of using chemo when the patient might only have a cold. My thought was there had to be a better way, so I quit attending the class and sought out other like-minded beekeepers who were reporting success raising bees without chemical intervention. I drank the kool-aid and soon became convinced using small-cell foundation, dusting with powdered sugar, and never placing any chemical into my hives was the answer. It was almost cult-like and I taught several classes and attended several conferences on how to raise bees sans chemical treatment.
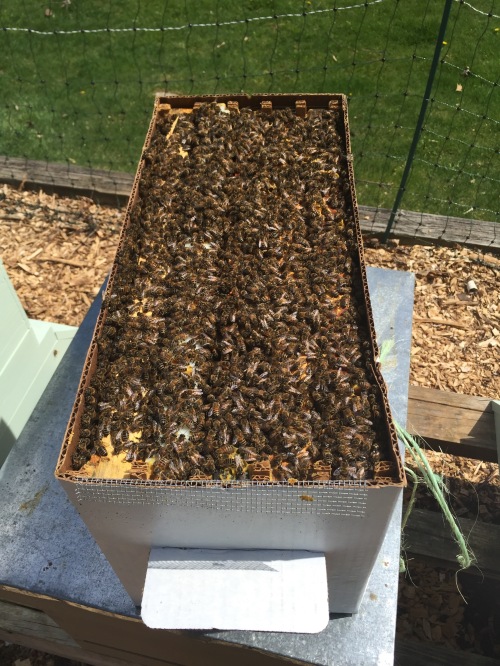
   At first, I had good results overwintering hives and believed it was my management techniques that were making it happen. After a couple of years tho’, my losses started to mount. 50-75% winter losses became the norm and finally, during one winter, I lost 25 of 26 hives. I was devastated and called in the NH State Apiary Inspector. The verdict was one word…mites. In retrospect, I think my early successes were really the results of buying packages and nucs that had already been treated prior to delivery with Amitraz, fluvalinate and/or coumpahos that had so depleted the mite population, the bees were able to survive the 1st year without any additional treatment required. It wasn’t until the 2nd or 3rd year that the viruses transmitted to the bees via v. Destructor caused my colonies to die. I realized I actually had very little to do with the success of the colonies but certainly had everything to do with their demise. I was not a beekeeper but a bee-haver, buying new bees every year to replace losses. To this day, I know beekeepers that have great success being treatment-free. They are willing to accept losses in the hope long term change will happen. I was – and still am – a small backyard beekeeper and I simply could not tolerate the losses.
Evaluation and Change
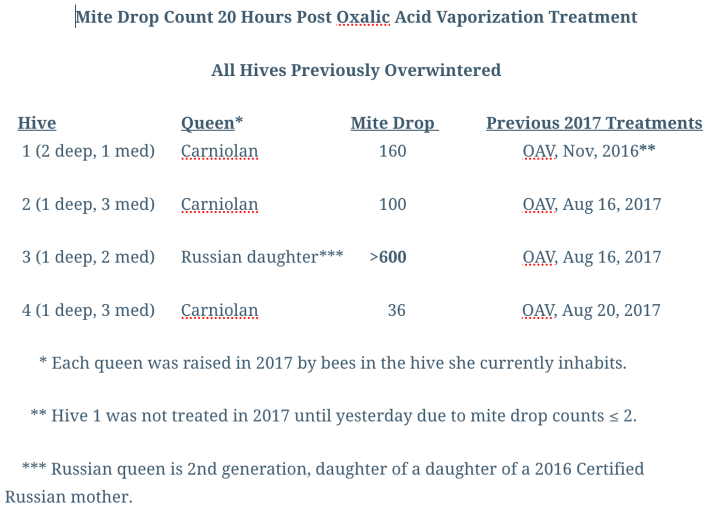
   Unfortunately, this also proved to me that using hard chemicals can work. Still, their use went against my desire to tread softly on the planet and holistically raise bees. I refused to believe one had to use hard chemicals to beat mite infestations, nosema, etc., in order to create a sustainable apiary. So I stopped buying packages and only purchased northern-raised, overwintered nucs and queens. I started monitoring for mites more often, performing splits, yearly re-queening, and becoming more interested about moisture control during winter. Finally, I read about a mite reduction technique having great success in Europe called oxalic acid vaporization (OAV). So 2 years prior to OAV being approved in the US, I started using it on a couple of my hives. By adding brood breaks at the end of May to reduce the spring mite load, better timing my splits and nucs, routinely monitoring for mites, treating with OAV in August and November and wrapping all hives and nucs with tar paper, my loss rate dropped to 15%. Eureka! This was a major improvement!
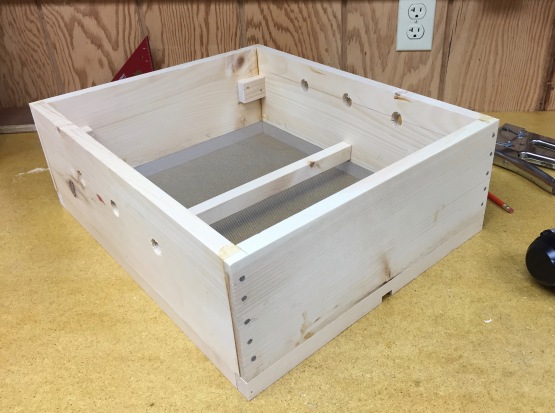
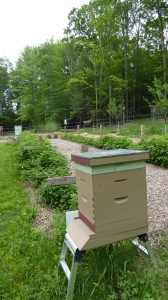
   My queens now survived multiple years yet I still felt there were more ways to improve overwinter survival. Many beekeepers were using a device called a quilt box to control winter moisture build up so I decided that would be my 2017 (maybe 2016) improvement. After looking at a number of designs, I modified one that allows me to go into a hive on a 0ºƒ day, take a look and add food, if needed, in less than 15 seconds. Better fed than dead…I think I lost 1 nuc in 2017 and that I believe was due to a -20º spell that kept the cluster stationary and they starved several inches away from honey.
So THAT worked…Now fine tune
   Spring, 2018 brought the latest change to my management plan. As soon as the temps were over 50º for several days, I did a single OAV treatment to every hive, allowing every colony to start the year off with a mite load of what I believe was under 1%. Monitoring showed this kept the mite load so low during the summer that I did not treat again until early August just because I wanted to again get back to under 1%.  This addition to the plan resulted in no losses in 2018. Let me state here that when I treat hives with OAV during the summer, I remove all of the honey supers. Though OAV is considered an organic treatment, my honey customers expect me to provide them the purest, most natural honey possible. The ONLY time I leave supers on is in November when doing the final treatment before winter. Any honey remaining in the spring is removed and added back the following fall ( I have a “bee freezer” in the barn and keep the frames frozen during the summer).
My Current Technique:
   So history is nice but what is my current plan? Well, it may not jive with yours but here is what I find works for me. Since it’s almost spring, I’ll start here.
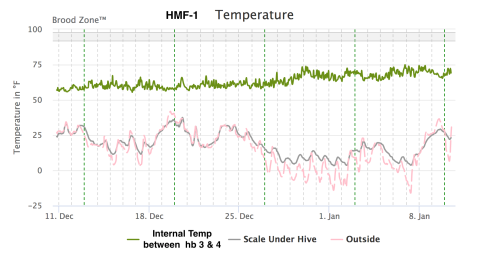
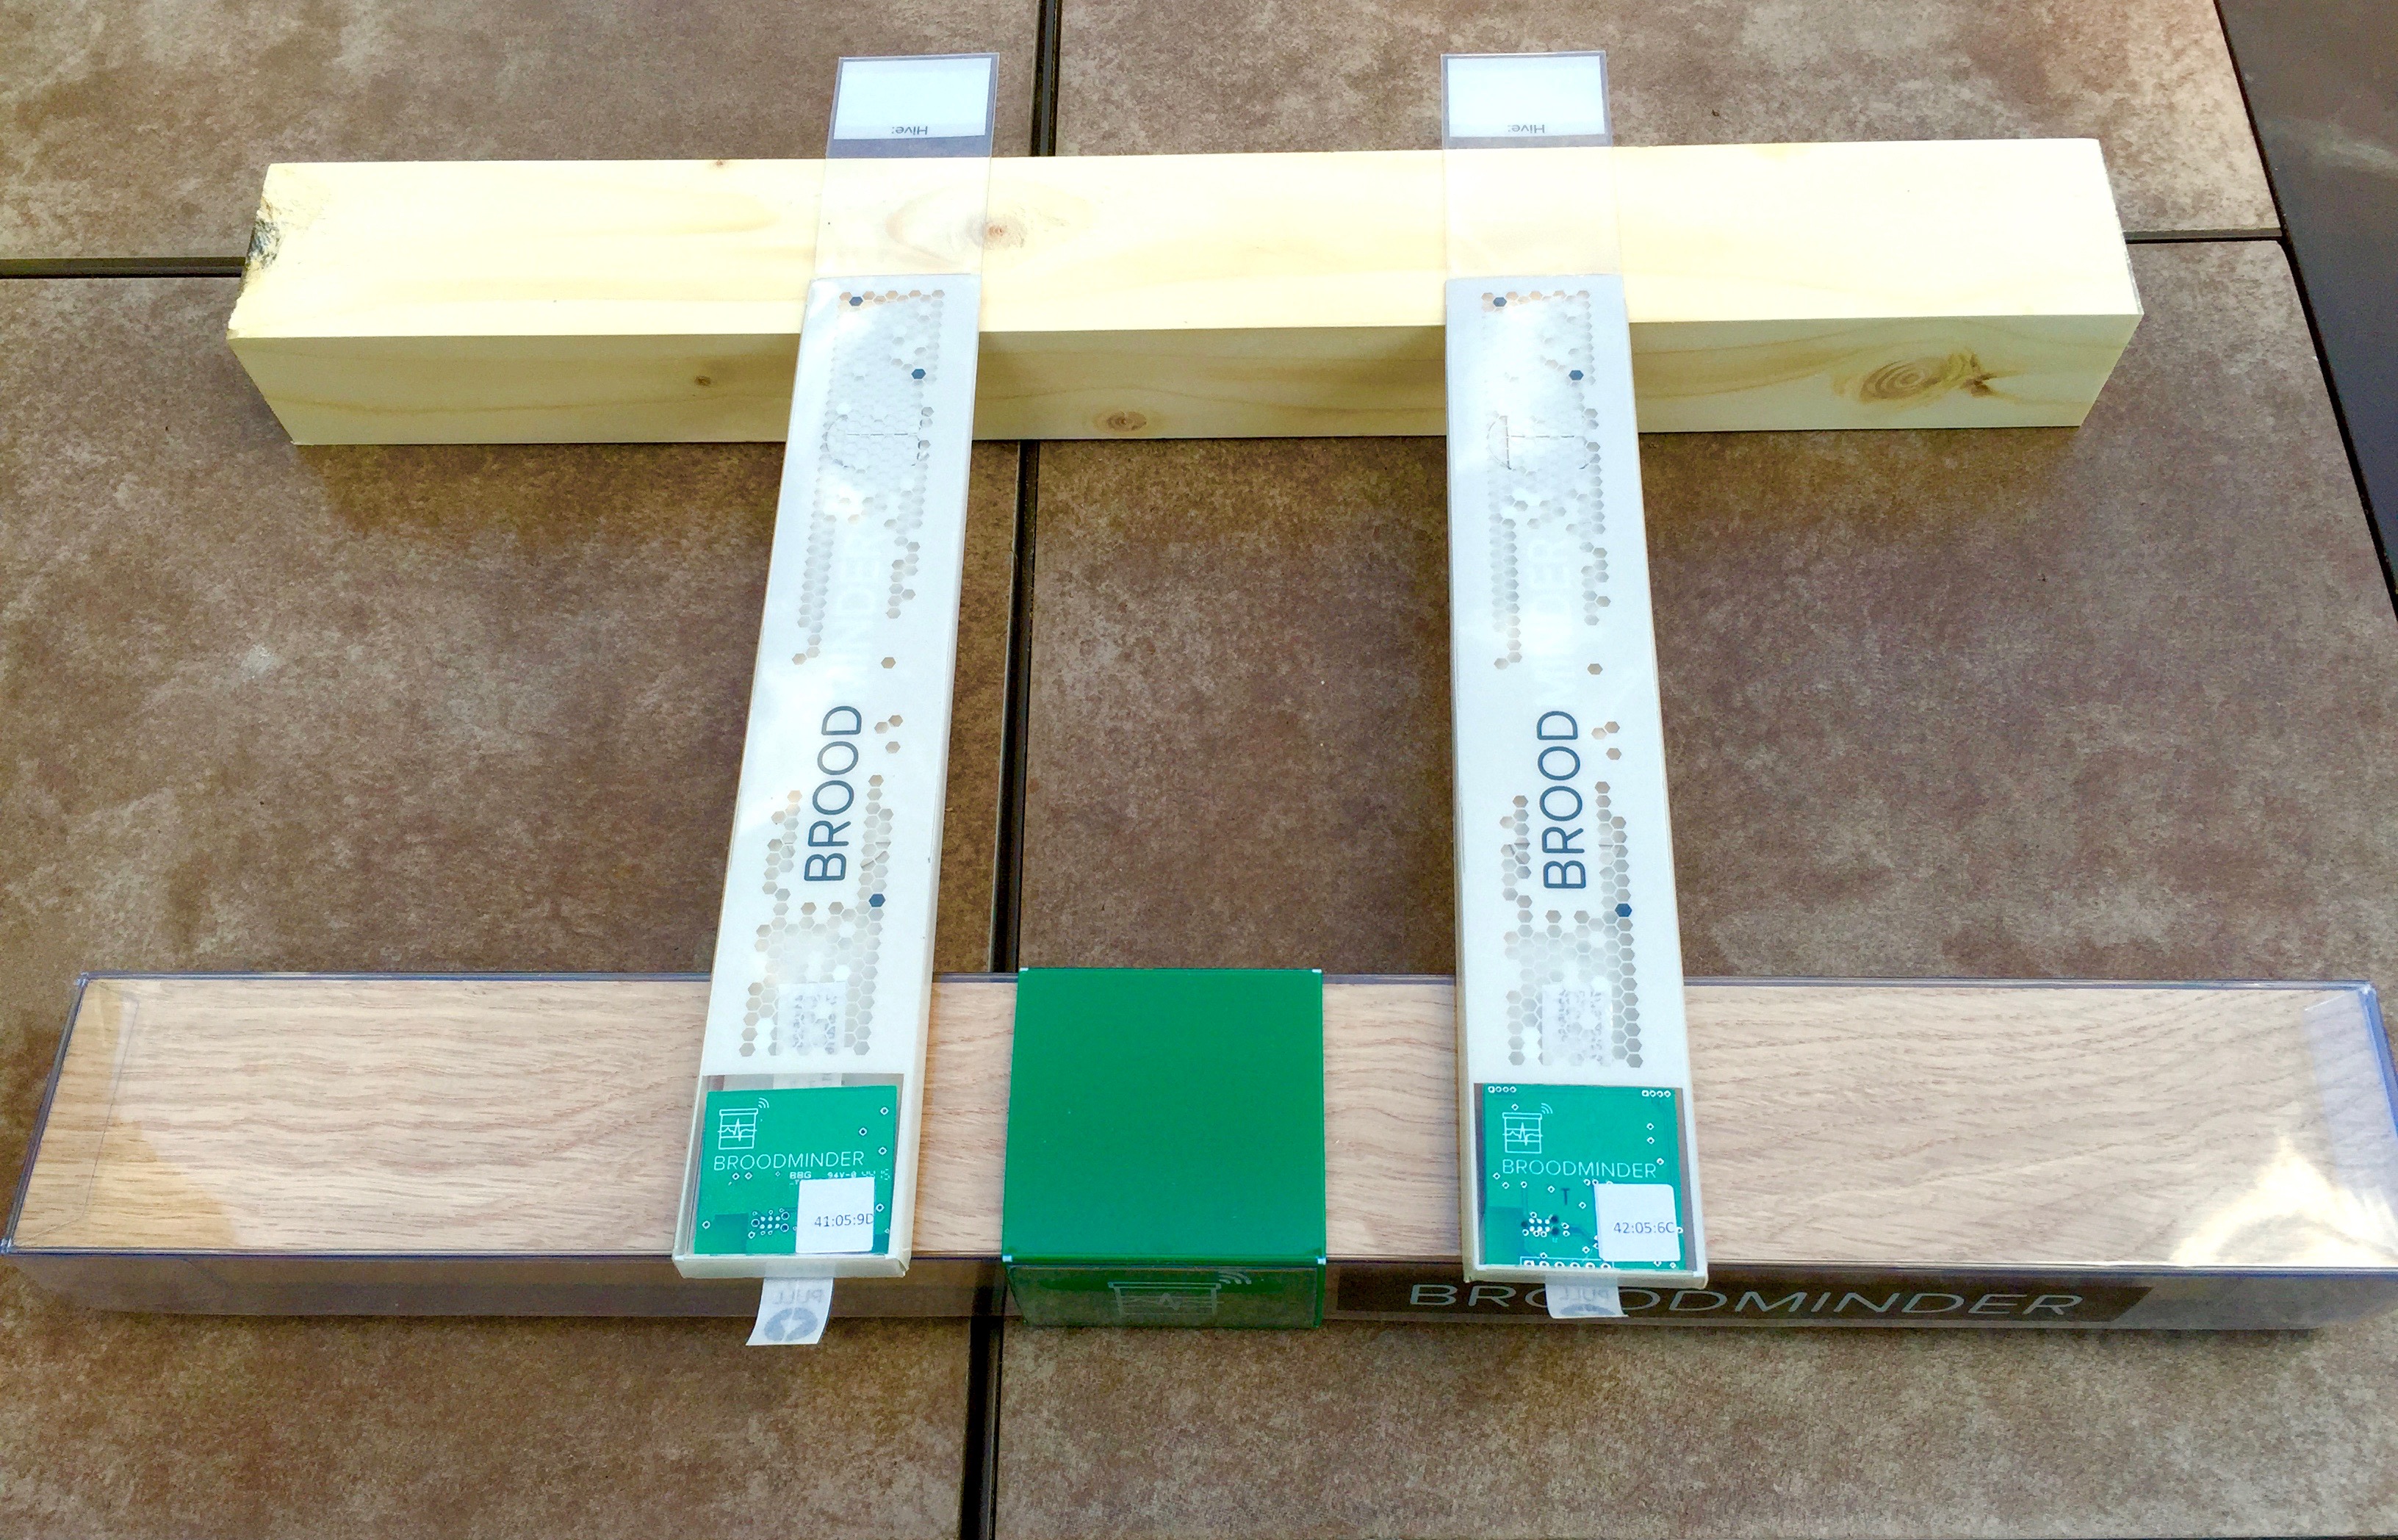
   March: I check my hives every 2-3 weeks depending upon weather and my Broodminder temperature sensors (see previous posts). I wait until mid -March before placing pollen patties on the hives. Why so late? As a backyard beekeeper (albeit, several backyards) , not a commercial beek,  I do not want to over stimulate my queens in February and create a lot of brood that the bees will have to cover during temperature swings. Additionally, I do not want to create a potential  swarm in April by having the hives build up too soon. Even though the hive will raise another queen, she will not be properly inseminated during flights in late April or early May as the drone population is too low. By starting in mid-March, those problems are avoided. If the temps warm up later in the month I will do a single OAV treatment to every hive.
   April: Still a tough month depending upon weather. I continue to feed if necessary and will possibly remove the tar paper near the end of the month if temps permit.
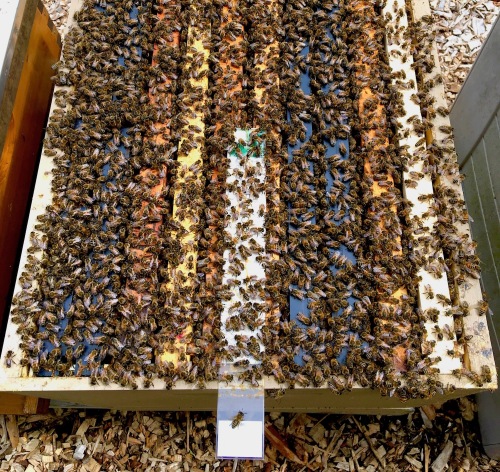
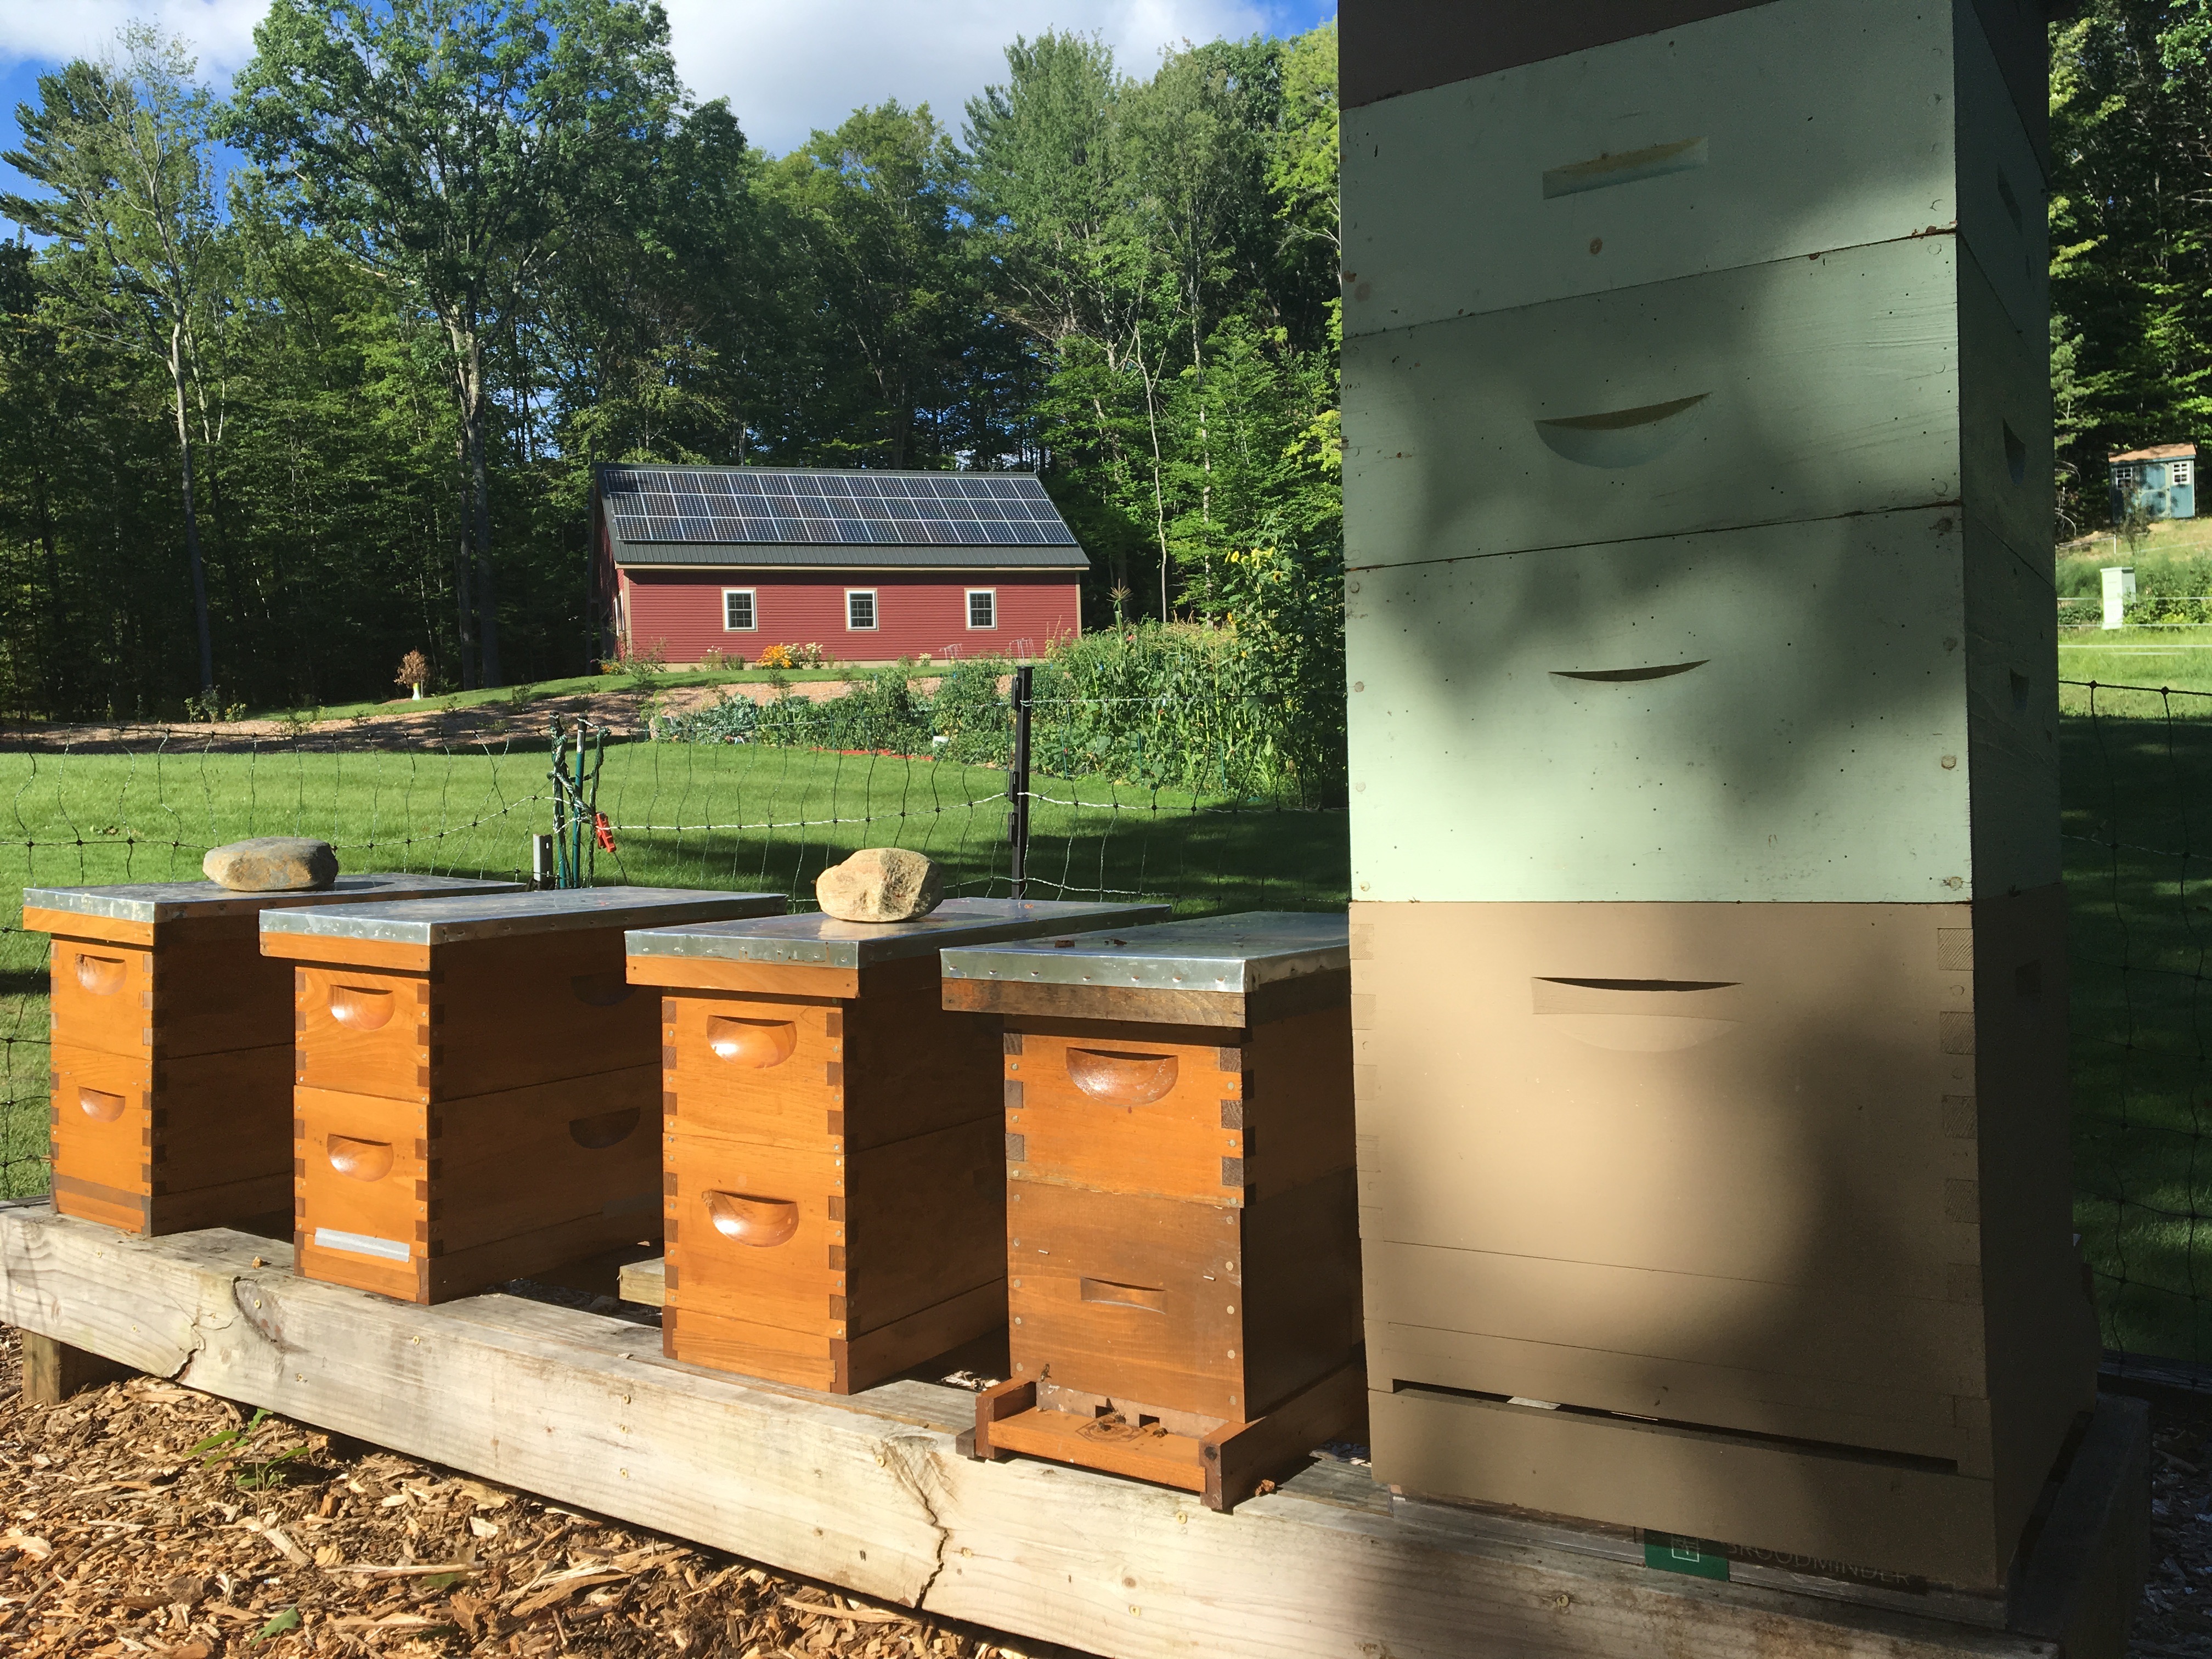
   Early May: Tear down the hives, remove all quit boxes and any tar paper wraps, clean out the dead bees, replace the Broodminder batteries, reassemble the hives balance out the honey frames and closely watch the nucs so they do not overpopulate and swarm. I feed only if  necessary.
   Late May: Prep nucs for sale or move them to full hives. Monitor for mites to make sure mite load is extremely low. I will do a brood break on several hives so they raise their own queens and become honey producers during the June through mid-July flow (since there is little brood during the break, the nurse bees become field bees which helps increase honey production). I move the displaced queens to nucs and use them for resources (frames of brood) until July when I let them start to build up for winter. Meanwhile, the hives having the brood break now have fresh queens raised by the bees.
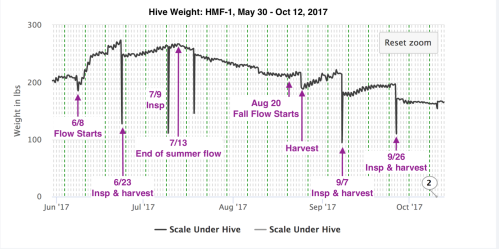
   June-July: Get used to the word monitor…Now we are in the sweet part of summer and the bees are pretty much left on their own to enjoy being bees. Depending upon the flow, I usually harvest honey for selling at the CSA. I will make my splits at this point if I want to increase the apiary size and move the new hives to a different yard. As I overwinter each of my nucs as 4 mediums, I make all of the nucs I plan to take through winter by the end of June. Did I mention monitor? This is when I also rely on my Broodminder sensors to monitor hive weights, watch the temp sensors to make sure the queens are viable and sit by the hives enjoying the dance of summer.
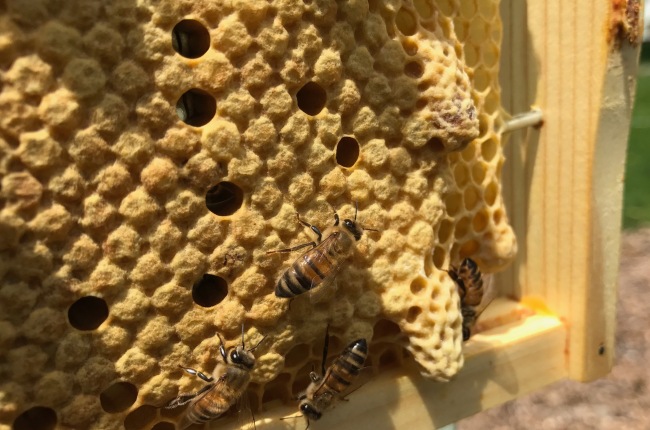
   Early August: Now is the time the bees begin raising the bees, that will raise the bees, that will eventually overwinter. I want these to be absolutely healthy and will monitor and probably treat with OAV over a 2-week period. The health of the apiary at this minute decides its long term sustainability.
   Late August: Since I want all colonies to be at least 4 mediums tall come winter (I prefer full colonies to be 5 high) I will start feeding any colonies that appear to be underweight. This usually means nucs, as I have stolen frames of honey from other hives to feed them through the summer but now everyone needs as much honey as they can put away. Monitoring continues…
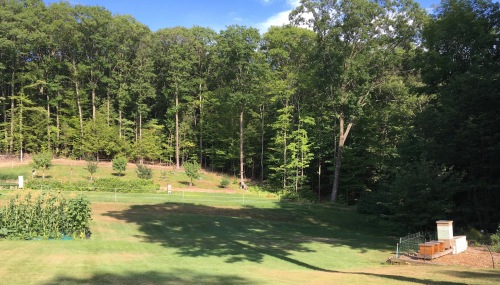
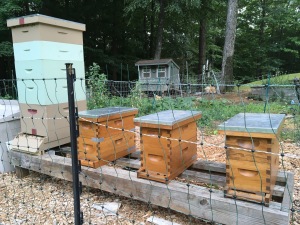
   September: Mouse guards go on. Monitoring and feeding continues, being careful not to back fill the brood chamber as the fall flow will also start. Now is the prime time for mites to overrun the hive as the number of bees begins to decrease but the mites keep rocking along. If you have not treated yet, DO IT! I check on the condition of the quilt boxes, making sure I have enough and that they are ready for winter. I also will try to equalize hives to make sure each has a similar amount of pollen, food, brood etc. as they get ready to end their year.
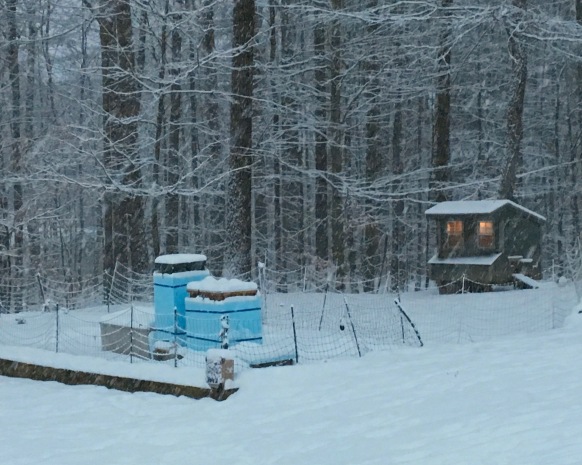
   October: I like to quit feeding by the end of the 1st or 2nd week in the month. This gives the bees time to cap any nectar which helps lower moisture in the hive. Hopefully, every hive has at least 3 mediums of honey, the bees are in the bottom 2 hive boxes and my mite load is under 2%. Quilt boxes go on mid-month and the hives are usually wrapped by the end of the month or early Nov. I should mention, I now keep my fences on and baited all year long after having an incident last October. I do a final apiary clean up, including trimming any grass very low, within the fencing. I also replace all Broodminder batteries at this time so they do not fail during the winter.
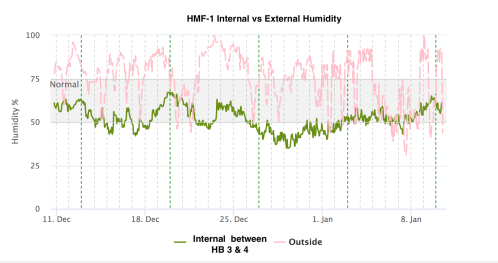
   November: Now comes my final single OAV treatment. This leaves the bees clean for the winter. I neglected to mention, I use screened bottom boards with both bottom and top entrances all year long. At this point I leave the sticky boards in place, reduce the bottom entrance and leave the top entrance built into the quilt box open. This allows some air to still enter the bottom of the hive and exit through the quilt box, keeping my humidity level in check all winter.
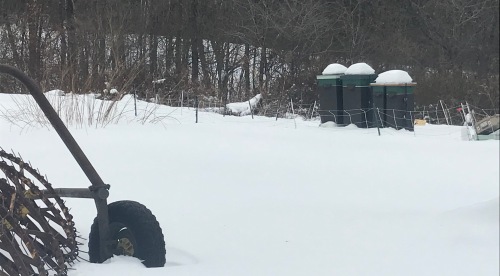
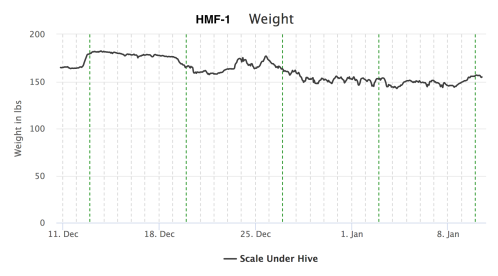
   December – February: Watching my Broodminder sensors, going out and listening to the hives (use a $12 stethoscope from CVS if need be) and occasionally raising the quilt box for a quick peek at the top frames to see if the bees have come up and need to be fed is about it for the winter. My change this year for going into 2020 will be to add sugar blocks when I close up the bees in November. Bern Snow mentioned he does that. It makes sense to me so I will try it.
Summary
   So there you have it. Every beekeeper has their way of doing things that hopefully works for their bees. This happens to be mine. As I stated in 2008 when starting this blog, right or wrong, I will tell you what I do and the results I achieve. On March 12, 2019, following the method of holistically managing the whole hive outlined above, I currently have 7 of 7 hives and 10 of 10 nucs alive and buzzin’. That does not mean that is how it will be in May but I’m thankful for the result so far. Honey bees die even when you think you are doing everything correctly. The very best of beekeepers loose bees. The key is figuring out what little thing you may have missed and trying to fix it. I believe every time you open a hive, the bees are trying to teach you something. Our job is to figure out the lesson.
   I hope your bees are warm, full and building for spring! Have a great 2019 and did I mention not to forget to monitor?

This morning dawned sunny with the potential of a warm-ish day (47º as I write this).  While it was early and the temps were still in the mid 20s, I decided to take a quick peek and see if any of the nucs had bees on the top frames yet.

I can hear some of you now, “You opened your hives when it was in the 20s?”. Yup. I wanted to see where the bees were before it was warm enough for them to break cluster and use the top entrances. Based on the design of my quilt boxes, I can open a hive, look at the top frames and close it in less than 5 seconds. All I want to know is are there bees on top or not. I don’t linger. It’s in and out. Happily, of the 3 nucs I checked, only one had bees visible on the top frames. After taking data samples on the 2 full hives nearest the house, I decided to do the same and quickly peaked into the full hives. True to what the sensors told me, there were a few bees visible in one hive and none in the other. Using a cheap stethoscope, I found the largest hum coming from the center of each full hive stack.

The only issue was the top frames of the 1 nuc were completely covered with bees. Thinking ahead, I purposely did not process all of the honey last fall and stored 4 full honey supers in the”bee freezer” in the barn. I waited until it was a bit warmer, put 5 honey frames in a nuc box, pulled the quilt box off the hive – exposing the bees on the top frames – placed it on top of the new honey super I was adding and quickly placed both back on the nuc, thereby adding 5 frames of honey and keeping them fed. Total exposure time for the bees was less than 10 seconds.

But what would I have done if they didn’t produce excess honey last fall? My quilt boxes have a 1″ shim, an open space specifically designed for sugar blocks, patties, etc. built into each one. That makes it very easy to quickly tip the quilt box forward, place several sugar blocks on the top bars and lower the quilt box back into place. Again, this would take maybe 15 seconds as I would have to use the 4″ x5″ sugar block to gently “plow” some bees out of the way in order to place them on the top of the frames. When I use sugar blocks I usually place 2 in each hive. I like these as I find them easier to make than a candy board with less clean up in the spring.

Lauri’s Recipe

I found a great recipe for these on BeeSource.com that was created and posted by Lauri Miller, a very respected beekeeper located in Roy, Washington who often shares her results there with members. I greatly appreciate her allowing me to discuss it here. Click on the following link to be taken directly to her original post (with 23 pages of comments!).

http://www.beesource.com/forums/showthread.php?290641-My-recipe-method-for-sugar-blocks&highlight=Laurie+sugar+blocks

Lots of folks liked her recipe so I modified quantities slightly for my needs as her recipe makes 25 lbs. Mine makes 8. I also made a couple of ingredient changes based on what I have on hand and the fact I do not wish to feed pollen to the hives this early (which I believe she may also mention…). Please know this is entirely her work that I have only slightly modified. So you can look at Lauri’s to see her excellent pictures and technique or use my variation of her recipe below. MANY thanks to her for posting how to do this! Following her instructions with my slight amendments, I successfully fed my hives last winter without any issues. Thanks, Lauri! You rock! If you are on FaceBook, her page is:

https://www.facebook.com/Miller-Comp…6954971040510/

My Variation

8# cane sugar
10.5 oz Braggs Organic Apple Cider
2/3- 3/4 T citric acid (Found in your canning dept)
3/4 tsp Honey-B-Healthy                                                                                                                    1/2 tsp Vitamins-B-Healthy

– Mix sugar and citric acid together in a five gallon bucket.

– Mix Braggs and the HBH and VBH together in a separate container and mix into sugar with a large drill and paint paddle mixer.

– Mixture will feel very soft, but not wet or sticky.

– Using 1 full size and 1 smaller cookie sheet, I place the mixture on the cookie sheets and  roll it out so it is about 5/8″ thick. Use any size pan you want, but be sure your bricks are no taller than your shim under your inner cover!

– Cut the blocks out now as you will not be able to do so once it hardens. I make mine  about 4″x 5″rectangles so they will fit into nucs.

– Place sheets in a 130º oven for about 3 hours or until hard.

When finished, I let mine sit for a couple of days in our garage to dissipate the strong vinegar odor. Our house definitely smells like vinegar while these are in the oven drying. It’s not bad, it just does…When they are aired out, I place the blocks in a covered container so they are ready for use and protected from mice, etc.

As mentioned, when needed, I feed 2 at a time to start and go from there. I do tend to wait until the bees are at the top as I do not want to entice them to bypass honey to get to these. Not completely sure they will, but knowing how bees like to remove anything foreign from their hives, I prefer to wait until they need it for food.

Works for me. I hope it works for you, too.


Note: Based on yesterday’s post, I had a request to show a graph of the 2017 honey flows in my home apiary. To make sense of this graph, if you have not read the previous post, please take a minute to do so as it explains how the graph is created.

Honey Flows

This graph below depicts hive weight for my main hive in our home apiary from May 30 – Oct 12. The queen is a hive-raised daughter of an overwintered Mike Palmer queen I removed from the hive in late May to break the brood cycle and put the hive into honey production mode. Removing the queen (I created a nuc with her)  not only breaks the brood cycle and reduces mite load, it creates more foragers as not as many nurse bees are required. 

My BroodMinder sensors are set to grab data once per hour. The sudden dips are simply showing that a reading was taken while I happened to have supers removed during an inspection. You can see that in my home apiary, based only upon weight gain, the 1st flow was from June 8 – July 12. The fall flow lasted from Aug 20 – Sep 26. On my computer, I can drag a pointer along the black line and see the actual weight scroll along with my cursor. Any time period can be selected for review. I chose these dates simply to show both flows. Hopefully,  this helps show how the data is interpreted.

Screen Shot 2018-01-14 at 10.08.28 AM.png

The Value of Solid Data

CSA winter

2 hives and 2 nucs at my out yard. Note buried bottom entrances…

I recently noticed an uptick of posts on our local club’s FaceBook page from beekeepers wanting to perform quick hive inspections and feedings during our recent warmup. Folks are obviously concerned about their bees after 2+ weeks of below zero temps and suddenly, here are a couple of 40-50º days with a chance to look inside. I totally get it. We all are concerned about our bees during the winter. After having looked, many are now concerned because their bees are at the top near the upper entrance and they think they have to quickly feed because the bees are going to starve. Personally,  I believe that is not the case as there are logical reasons the bees are on top;

  1. The bottom entrance is blocked by dead bees that have fallen to the bottom board.
  2. The bottom entrance has recently been blocked by snow.
  3. The warm temps cause the bees to break cluster and take advantage of the warmer temps to do cleansing flights.

If you properly prepare your hives going into winter, there should easily still be honey available. It IS only mid-January… I do not start being concerned about food stores until sometime during Feb/early March and only then because the bees may have “chimneyed” – gone straight from the bottom to the top and not bothered with honey frames 1-3 or 8-10. In that instance, you absolutely may need to feed them supplemental sugar blocks, a candy board, fondant, or whatever you fancy as they have bypassed 20-30 pounds of honey on their way to the top. Yes, right now some of the bees are at the top during the warm spell but they will go back down and rejoin the main cluster as it gets colder. I prefer not want to entice my bees to the top by providing them with a supplement they do not yet need.

Hive Management Based on Data

Fortunately, I have another tool that provides me solid data throughout the year to know when the flow begins and ends, the health of my queen plus the location of my bees and the amount of remaining stores in winter.  I incorporated BroodMinder into my apiaries, a wireless telemetry system that provides me with total hive weight, plus both internal hive temperature and humidity readings vs. ambient readings straight to my cell phone or iPad. Rather than do a commercial for them, click their name above and read about the system on their website…

BroodMinder th

BroodMinder TH sensor in place during summer

My friend, Rick, and I first saw them at the 2016 EAS meeting in New Jersey. Being rather geeky about our bees (well, I am…) we each purchased a system for about $200 (show price) that included a hive scale with ambient temperature reading that is placed under the hive, and 2 internal temp and humidity sensors placed inside the hive itself. Unfortunately, at the time it was not as ready for use as we thought and Rick sold me his scale, tho’ I believe he still uses the temperature and humidity sensors. So now I have 2 complete BroodMinder systems –1 in each bee yard, plus 2 more internal temp/humidity sensors that I have placed on top of the uppermost super, just under the quilt boxes, (or inner cover in warmer months) in 2 other hives. All I have to do to download the data is visit the hive and run the app from my iPhone or iPad. Android systems also will do the trick. While originally not very impressed, I now find the weight, temperature and humidity data very helpful and do not have to disturb my bees as often.

BroodMinder automatically generates excellent graphs of the data for you to read, determine trends, hive changes, etc. As an example, allow me to show the readings I took earlier this week of the past 30 days, how I interpreted them and what action I didn’t take…

Total Hive Weight

HMF1 weight
This graph gives me the total weight of the hive, including snow cover which I do brush off occasionally. In the winter, I use this only as a general guide as to how much honey remains in the hive. In this instance, based on hive configuration, I believe there is approx 60 lbs of honey remaining.

In the spring and fall, the increase of the hive weight shows me when the flow starts and ends, telling me when to build my nucs, pull supers for harvest etc.

Internal Temperature vs. Ambient

HMF1 temp
The graph I care about the most in winter is the temperature graph. This tells me roughly where the bees are located within the hive stack and if they are alive. This particular sensor, unlike in my other hives is located between the 3rd and 4th medium, not at the very top of the stack. The green line is the internal temperature, the grey is the external temp sensor located on the scale device and the purple is data from my weather station located in my orchard approx 100′ away from the hive. In this case the 2 external temp readings vary as the BroodMinder external sensor under the hive is buried in snow. The internal temp reading tells me the bees are at the top of the 2nd super from the bottom or just entering the 3rd super but are slowly moving upward as the temp is slightly increasing. When it reaches the high 80s-low 90s, I know the cluster is at the sensor. Today, I can tell without opening the hive that the bees are alive and currently in the approx middle of the stack.

In summer, this can also tell me about the health or even the presence of my queen. A sensor placed right above the brood chamber will provide a stable, flat line graph at about 93ºF when the queen is healthy and laying. Should she stop or die, the graph becomes very choppy and will be a lower temp (as actually shown above).

Internal Humidity

HMF1 Humidity
Wet bees in winter means dead bees in spring. This graph depicts the internal vs external humidity readings. For this hive, here is where I wish I had added a 2nd sensor, instead of putting it in another hive, and placed it at the very top of the stack vs between supers 3 and 4 as it would tell me the humidity at the coldest part of the hive, giving me the best data for how my quilt box is doing with ventilation. BroodMinder automatically shows me the ideal range as depicted. If the sensor was 1 super higher, I believe it would show the quilt box is working just fine.

Actions or in this case, Inaction
Since, due to cost, I do not have sensors and scales for every hive and nuc, I tend to extrapolate the findings across that particular apiary. While certainly not foolproof, it does give me a general idea of how the full hives are doing – especially since 2 of the other hives also have internal temp and humidity sensors in them. Based on this current data, I did not open my hives to see if they need stores. I obviously can listen to every other hive in the apiary to know that they are currently alive. Next year I will expand the internal sensors to include my nucs.

All of the data from BroodMinder is uploaded (if you choose) to a website, beecounted.org, that is available to beekeepers and – more importantly –  researchers, providing a treasure trove of individual hive data from across the US, Canada and even a few in Europe. I enjoy having my hives part of that data set. I can look at other hives in New England and compare them to mine to see how mine are doing regionally vs in just my 2 yards. The nice part is I am still learning how to use the data while BroodMinder is continuing to find ways to make it easier to gather and understand. I feel by combining this data set with Hive Tracks, I have all of the necessary information to best manage my hives at my fingertips (I hope…). While not being for everybody, if you are a serious beekeeper, these are a pretty cool set of tools!

BTW, I bought all of the BroodMinder sensors (and the Hive Tracks subscription) that I mention in this blog. Neither group has asked me to write this nor has either company provided me with any incentive to do so. I wrote this only because I believe it will help me become a better beekeeper and that I promised 11 seasons ago to share with you what I do to reach that goal.

Happy New Year! Order your nucs while you can still get them, repair your older supers, build your new frames and read a bee book by the fire. I hope your bees are still buzzin’.

Russian bees were brought to this country due to their proven ability to overwinter and tolerate V.destructor.  Many of us tried them and now have them in our apiaries. That does not mean buying a Certified Russian queen, nuc or colony and expecting that tolerance to continue into future generations is accurate. As soon as a certified Russian queen becomes ill, ages, dies or is for whatever reason replaced by one of her daughters, local genetics start to erode that tolerance.

Last year I bought a certified Russian nuc. Something was not right about her highness and they were the nastiest bees I have ever experienced. I know the problem was my exact queen as 2 of my friends bought nucs at the same time and their colonies were – and still are – gentle and easy to work. My queen, however,  must have had the nastiest pheromone known to bees and it was not uncommon for me to have hundreds if not over a thousand bees on me shortly after opening the hive for inspection. Yes, I should have returned her but she was unmarked and very adept at hiding.   I tolerated her until the day I luckily saw her scampering for cover, caught her and happily crushed her with my hive tool! Now queenless, I allowed the bees to raise her daughter who they ended up replacing this summer by raising, a now 2nd generation, Russian queen.  The hive  remained pleasant, tho’ not a huge honey producer.

Meanwhile, the mite counts in my apiaries, monitored via 24 hour mite drop on sticky boards, have been low all year and I did not have to treat until August when, due to low kill rates,  I only did 2 rounds of OAV . Now jump to yesterday when I decided the weather was perfect for doing the final OAV treatment of the year. It was sunny but only mid-forties, keeping most of the bees in the hive. As brood production has basically halted, treating now allows the bees to go into winter with a minimal mite load. Below are the results after 20 hours of treating the 4 hives in my home apiary. The nucs were treated today and are not included, nor is our out yard which still requires winter prep.

__________________________________________________________________________________________________

OAV 20 hr data


__________________________________________________________________________________________________

Given that there are probably a minimum of 15-20,000 bees in each of the Carniolan hives, I believe they all had a low mite load prior to treatment. The Russians have 12-15,000 bees so their pretreatment load appears considerably higher. Naturally, the counts will increase over the next few days and I hope to report what the counts are after 3-7 days, as well. What I found surprising is the apparent significantly higher mite count seen in the Russian hive (≥ 4%) – especially when compared to Hive 1 (≥0.4%) which has not had any kind of chemical treatment since the final OAV dose Nov, 2016. Did the Russians have a higher mite load prior to treatment, are they simply more hygienic or is there a different reason?

Please note: Each of the hives experienced a brood break sometime during the 2017 season to raise a new queen.

Granted, this is a VERY small number of hives but, to me,  the take away is it makes great sense to monitor and treat EVERY hive, regardless of the race of bees, to keep them as healthy as possible during the cold months coming. Just because it’s a Russian hive does not mean you do not have to treat it. Further, the tolerance of my Russian bees has been diluted after 2 generations of daughters. Should this queen survive winter, I will place her in a nuc next year and replace her with a Certified Russian Queen.

Other Winter Preparations

Last weekend, in preparation for yesterday’s OAV treatments, I inspected each of the colonies in our home apiary (4 hives, 4 nucs) and equalized the amount of honey stores throughout the apiary. Pretty easy to do as it really meant pulling frames from most of the hives so that every colony goes into winter as the equivalent of 2 deeps and a medium. All except the Russians, who are very frugal with their stores and are now configured as a deep with 2 mediums. I do need to still pull 2, now empty, mediums off of one of the nucs and replace it with 2 mediums of honey from my stash of 30 honey frames. All of the colonies now have quilt boxes on them for moisture and ventilation and are ready to be wrapped with roofing (tar) paper.

This week, if weather permits, I’ll visit the 2 hives and 2 nucs at our out yard at Hillside Springs Farm (Cheshire County’s “Farm of the Year”) and put them to bed. Then it’s clean the smokers and hive tools, repair some hive bodies and head to the wood shop to make Christmas presents. It’s been a great season – actually our best ever. The bees produced over 200 lbs of honey, we were honored to make 96 wedding favors for Chris’ and Heather’s wedding, we gave away and sold some nucs and hives while still increasing our apiary by 2 hives and 3 more nucs, raised new queens in all of the hives and harvested our first ever peaches and apples. A nice year indeed for our little Honey Meadow Farm!

I hope you had a great season, that you listened to and learned from your bees, that they are contentedly buzzin’ and now ready to be tucked in for winter. I still want to post about my experience with Broodminder and how the data it provides helps me with apiary management. Between Broodminder and Hive Tracks, I now have all the info I need for my bees at my fingertips. More soon…

72 Hour Update

Here are the mote drop counts after 72 hours…

OAV 72 hr data


Not much of a blog if the guy only writes once a season, eh? Sorry, busy summer with our family, the orchard and the apiary. All good so I guess this better be a good post!

Overwintering Success

IMG_0844

One hive and 3 nucs  all with quilt boxes and wrapped in foam board

Last year I went into winter with 4 hives and 3 nucs. I wrapped 2 of the hives with tar paper and put 2″ thick foam board around each of the rest to see if there was a difference. There wasn’t except the foam board was more expensive, plus a huge pain in the backside to size and strap into place.

IMG_1696

Frame of quilt box

More importantly, I placed quilt boxes on every colony. The boxes allowed a 1″ space for sugar blocks and/or patties, then a piece of screen to support a layer of burlap and 3″ of pine shavings. I drilled several 1″ ventilation holes to allow moisture to escape from the shavings and then placed 2″ of foam board to insulate the very top. The quilt boxes went directly on top of the supers without using an inner cover and were topped with the outer cover.  These worked great and the colonies had no moisture issues all winter. I also treated every colony with OAV in late November after they were broodless.

Results: I lost 1 nuc that was actually a late combination of 2 weak nucs just before winter.  Once again, take your losses in the fall…I could have used those bees to boost other colonies and trashed the weak queen rather than done all of the work to get them through, only to loose them late winter.

The 2017Season

-Breaking the Brood Cycle, Raising Queens, Making Nucs and Harvesting Honey

So this does not become a 50 page post, I’m going to only hit the management highlights that have brought me now to prepping for winter.

IMG_0184

Emergency and swarm cells go straight to the queen castle.

My main concern this spring was that my queens in the 4 full overwintered hives were now 2 years old and I did not want them going through a 3rd winter. I also wanted to go into the 2017 winter with 6 full hives and 6 nucs, so I was going to need queens. I also was not very happy using MAQS last year so I decided late May /early June would be a great time to pull queens, break the brood cycle, let the bees raise fresh queens and take some of the extra cells and raise queens for nucs. Without gong into great detail, it all worked. By pulling queens out of the hive and stopping brood production, a number of useful things happen.

1. The bees start emergency cells which results in a new queen in the hive and allows me to place the additional cells in a queen castle to raise additional queens for nucs.

2. The mite breeding cycle is interrupted since the hive goes broodless for about 10 days once all of the existing brood hatches,  the queen hardens, mates and finally starts to lay. This has kept my mite counts very low all summer. I did treat 3 hives with 2 doses of OAV but stopped as the mite kill was minimal and further treatment appears unnecessary.

3. With less brood in the hive, nurse bees take on other jobs and the percentage of field bees rises, resulting in increased honey production. In fact, between the 4 overwintered hives, this summer I have harvested 200 lbs of honey and could pull about another 100 lbs if I did not want to use it for surplus overwintering stores.

IMG_0717

Hillside Springs Farm is a bee paradise!

As we now approach the end of the season, I currently have 6 full hives, 5 with new queens. Only 5 as I never found the overwintered queen in one of the hives all season long, regardless of how hard I looked! Meanwhile the hive is booming, produced about 75 lbs of honey, provided bees for several of the nucs and will provide the honey stores for 2 other nucs  heading into winter. I also now have 6 nucs that should be ready to overwinter. It was 7 but this morning I decided to split a nuc that went queenless. There were numerous emergency cells in the hive but as they had yet to hatch, I decided to destroy the cells and split the 3 supers between 2 other nucs to boost their resources. Assuming a queen did hatch, mate and return, there is not enough time left for her to raise the population of bees needed to take the nuc through winter. I decided to take the loss of one nuc while making 2 others much stronger.

Honey Meadow Farm

Just a quick note on how the veggies and fruit did this year. Heavy rains prevented us from getting the garden in until early June and have definitely hampered the veggie garden this year. None-the-less, we’re really enjoying tomato and cuke sandwiches everyday for lunch, salads for dinner and looking forward to our corn. Gayla has lots of broccoli already frozen and canning will start soon. A lot of her effort went into growing the flowers for our son’s and new daughter’s wedding this month on our organic pasture in Sullivan. It was SPECTACULAR!

IMG_0702.jpg

The blueberries  and raspberries had an off year this year but the strawberries were fantastic and our orchard produced salable quantities of fruit for the 1st time! We had hundreds of peaches, plums are almost ready and apples aren’t too far behind! Continuing to follow Micheal Phillips holistic approach has kept us entirely organic and made for great foraging for more pollinators than you can imagine!

Winter Prep

With temps possibly dipping into the 40s within the next week, I just placed mouse guards on all of the colonies. I’m still doing 24-hour mite drop checks on the hives just in case there is a spike. If necessary, I’ll treat with OAV but really do not plan on treating any of the colonies until late November/early December. Each of the full hives will go into winter as 5 mediums. The nucs will be either 3 or 4 mediums. I’m almost out of comb so that will be the only reason a couple may be only 3 high. All of the colonies will be wrapped with tar paper and have a quilt box in place. I’ll feed the nucs, as needed,  2:1 syrup with Honey -B-Healthy and Vitamin-B-Healthy added. I use organic apple cider vinegar to change the pH of the syrup to approximately 4.5 to better match the pH of the bee gut. Hopefully, this helps with nosema, not sure…I plan to have all of my feeders off by the 3rd week in September so the girls can have it all capped before it gets too cold.

I’ll also monitor the 2 apiaries this winter using hive scales plus temperature and humidity sensors to help tell me what is going on inside the hives. I’ll get into this in my next post to let my geek side shine!

Naturally, you are all doing mite checks and making sure the bees that are about to raise the bees that will take you through winter are as healthy as they can be! Gotta keep ’em buzzin’!


Important Update on OAV

On October 12, 2014, I posted my preliminary results using OAV. As I mentioned in the post, at that time OAV was NOT approved by the EPA for treating v.Destructor and I was using it off label based on results of multiple years of use by European beekeepers. As we all know,  a year later the EPA did approve Oxalic Acid as a treatment within hives to reduce the populate of Varroa.

What I want to mention today is, based on current thought at the time, I wrote you could use OAV with supers on but suggested you should take them off if you plan on using the honey for consumption. Please know that now OAV is an approved treatment, the EPA label for OAV directly states “Do not use with honey supers in place to prevent contamination of marketable honey”.  Personally, I continue to use OAV only when the honey supers on the hive are being used to SOLELY FEED THE BEES overwinter. I never use any of the chemical treatments, including MAQS, whose labeling currently says it is fine to do so, if any of the honey will be for human consumption. Like most beekeepers believe, to me, honey is a pure product created by foraging honey bees and should not contain any beekeeper additives. Any time I put anything into a hive, my supers come off. This means I also separate the supers filled with syrup if I have to feed in spring or fall. Those are the supers that I place on the hives going into winter or freeze to use later in the winter if a colony requires more resources. When I place supers on during a flow, it is with an excluder in place and obviously no feeders. I am editing the Oct 12, 2014 post to reflect the current law.

Winter’s Comin’!

In Zone 5 or below, you should definitely have your mouse guards in place and be ready to pull any feeders so the bees have time to cap the nectar and not inadvertently create a moisture issue this winter. I’ll soon write about the quilt boxes I’ve built and how I will follow some of the advise of others and insulate this winter.

I hope you are enjoying the beautiful fall days and your bees are content with all of the stores they have produced for our long winter!


IMG_1582

One of our girls on golden rod

As beekeepers, we’re supposed to know what is happening in our hives. But really now…do we? Today is Labor Day. Any idea what your mite infestation level is now that the bees are making the bees that will take us through winter? If you have actually done a sugar or alcohol roll and truly know the number, CONGRATULATIONS! You are probably ahead of half of the beekeepers out there and, provided that number is less that 1-2%, your bees already have a decent chance of surviving winter.

A recent trip Rick and I took to the 2016 Eastern Apicultural Society meeting showed me I had become one of the beekeepers that did not know. I started beekeeping the right way, monitoring my mite load, breaking brood cycles, trying sugar dusting (I think all it does is tick them off), using a screen bottom board, small cell foundation, etc. My bees seemed to easily make it through winter the first few years and I

Collecting pollen on a Mexican sunflower

Collecting pollen on a Mexican sunflower

thought I was really enjoying the no treat life. Unfortunately, I became too involved at work, greatly reducing my apiary time  just as my number of hives was peaking in the mid 20s. I only had time to do an occasional 24 hour mite drop test, didn’t worry about breaking the brood cycle and suddenly I was loosing bees. In retrospect, my bees may have been doing OK and figuring out a way to live with mites (maybe?) but they certainly could not figure out how to live with all of the diseases mites bring into the hive. I went from being a beekeeper to a bee buyer. I hate being a bee buyer and I am determined to do what I can to give the bees under my care the best chance I possibly can.


Managing by Monitoring

I took the “Varroa Track” at the EAS meeting. Almost every one of the short courses I attended was about how to best deal with mites. Yes, that means treat. What I wanted to learn is what is the softest way to do so and still have the affect my bees need to survive.

We all know V.destructor is the primary vector for spreading diseases to your bees. Diseases that weaken bees so they are not healthy enough to overwinter. Control the mites, you directly impact the spread of disease inside the hive. It’s hard to manage a problem if you do not know you have one though. Not seeing mites on your bees during an inspection is no surprise. 80% of the mites in your hive are hidden in the capped brood cells, not waving at you while riding the back of your bees like a bronco buster. While still valuable information, counting mites on a mite drop board isn’t really accurate, either. While still valuable info, what it shows you is how the hive is trending. It does not give you an accurate infestation level. The best way for a backyard beekeeper to check their mite infestation level is via a sugar or ether roll. To learn more about how to do this, look at the last post and follow the link.

Nucs before feedingI came home from the meeting once again jazzed about monitoring and determined to develop empirical data to guide me in my hive preparations for winter. After doing a sugar roll on 4 of my large hives, I found all but one of the Palmer hives had mite infestation levels between 1 and 3%. Not bad but it’s the time of year where based on declining bee populations, mite levels soar. The 5th hive is the Georgia package that had just made a new queen after the package queen died (SURPRISE…not!) I did not test it as it just had a month long brood break.

MAQS on top of brood chamber

After having learned about all of the possible ways to treat hives while at the meeting, I decided to use Mite Away Quick Strips (MAQS) to knock down the infestation rate. MAQS, a formic acid based fumigant, is considered an organic treatment safe to use with honey supers in place. That being said, I removed mine and placed 2 strips in each of the 3 remaining hives needing treatment as soon as the weather cooperated. If you decide to try this, read the instructions carefully as MAQS is known to cause  serious queen and brood issues if used when external temps are over 90ºF. With our hot summer, I had to wait a week until there was a 5 day window when the ambient temperature would remain below 85º. I would like to tell you I did the right thing and followed up with more sugar rolls to see if the levels decreased but I did not due to other priorities. I am happy to say that all of my queens made it through perfectly, I saw zero affect on the brood and my sticky board mite drop counts have shown zero mites (a decrease from the 3-4 prior). Next is a follow up treatment using OAV when the hives are broodless late November/early December. That should put my mite threshold going into winter at less than 1%. The bees currently making the winter bees are now the healthiest I can make them, increasing the probability of healthy disease free bees this winter.


P1000155

Remainder of a “winter patty” and bee diarrhea in a dead nuc

Oh? But what about Nosema?

Yeah…That (and using homosote moisture boards that did not work) is what killed my bees in 2014. I really do not want to use Fumigilan-B. I consider it a “hard” treatment and my “no treat” side still hates prophylactic treatments. Instead, I have opted to try Hive Alive by Advance Science. This is a syrup additive similar to Honey-B-Healthy etc and supposedly provides beneficial nutrients to the bee gut, reducing the likelihood of Nosema. It is available through Brushy Mountain Bee Farm. All of my hives are currently being treated with it, including my 4 nucs. Could all be marketing but I’ve read several reports of beekeepers who love it and have had the results I hope to achieve. We’ll see this winter and spring . I will be sure to let you know what I find.


Current Results (as in keeping my fingers crossed)

HMF HoneyFor the first time in probably 4 or 5 years we actually have had a honey harvest. Without being greedy, we will pull a total of 130-140 lbs of honey from 3 hives this year! That is easily a record for us. We harvested about 100 lbs of that and have frozen the remainder as a safety net for feeding it back to them this winter. Besides every hive getting a gallon of syrup to deliver the Hive Alive treatment, I am also feeding the nucs 2:1 syrup to get them built up to winter weight. I am adding Honey-B-Healthy and Vitamin-B-Healthy to the syrup, plus 0.5 tsp/gal of organic apple cider vinegar to adjust the pH. Once we get a bit closer, I’ll look at the population in each nuc and decide if I can keep them as 4 nucs or if I need to do a paper combine. I hope to know in 2-3 weeks…


New Toy – BroodMinder

IMG_1380

BroodMinder Citizen Science Package: Hive scale and humidity and temperature sensors

Lastly, one cannot go to EAS and see all of the vendors without bringing home something new to try. This year, I bought a BroodMinder Citizen Science Package. This is a hive scale with an ambient temperature sensor plus 2 internal hive sensors; one for humidity and temperature, the other temperature only. Naturally, there is an app for all of this. If you want to be on the bleeding edge of hive monitoring, you can get this package for about $240, a GREAT price for a hive scale by itself!

We have found this to be more of a beta test level device than a finished product. The data is very interesting tho’ and I do believe once they work through some of the kinks,this is going to be a great device and will provide valuable

IMG_0630

Note the BroodMinder W (scale and temp device) under the hive

information throughout the year. I will report on this during the winter. Meanwhile it is at times frustrating and other times interesting what info it provides. The data can tell us when there is brood, when a hive goes queenless, when the flow starts/ends, if we have winter ventilation issues and more without having to wait for an inspection. Most importantly, the folks at BroodMinder are serious beekeeping geeks who truly want to help honey bees, as well as beekeepers, while providing valuable data to the apicultural research community. Tho’ they may not always think so from my postings on their forum, I am a believer that they will pull this off and I am glad I made this investment in hive monitoring technology! Stay tuned for more info…


Meanwhile, I hope your grill is ready for the last burgers of summer and your bees are happy and buzzin’. Macaroni salad, home grown corn, tomatoes and greens with burgers on the grill! Man, I am going to miss summer… Happy Labor Day!


Summer update.

This summer has been as busy as it has been dry. July 1st was a major day for me as I sold my company and officially became “semi-retired”. It did not take long for me to wonder how I ever found time to work with a lot of the newly found time going into our bees.

New Yard, New Friends – Hillside Springs Farm

Spring hill

Rick’s hive on left, package hive on right at Hillside Springs Farm. Strapped as I am only there every other week.

Last December/January I ordered a package, 3 nucs and gratefully accepted an offer from Rick of a hive to restart my apiary. I really wanted 3 colonies but ordered more as winter can play havoc with the availability of nucs come spring. Instead, we had the mildest winter in years and all 5 colonies needed homes by the end of May. In previous years, our home apiary of 4-6 hives struggled to make enough honey to overwinter without a lot of fall feeding (and NO honey harvest). My plan was to have 3 colonies here so I tried to find an out yard for the remaining 2 colonies. Luckily, Gayla learned about Hillside Springs Farm, a local CSA owned by Frank Hunter and Kim Peavey since 2002. From their website;

“Hillside Springs Farm is a small horse-powered CSA farm in Westmoreland, New Hampshire, growing 3 acres and over 100 varieties of vegetables, herbs, and flowers, using only sustainable, organic, and biodynamic farming methods.  Hillside Springs Farm is unique in the area for its extended 24-week harvest season, all-inclusive pricing, freshly pressed apple cider, and draft horse work.”

Frank and Kim are incredibly dedicated, the farm is bountiful, the veggies look outstanding and what a honeybee paradise! Thankfully, they allowed me to place the established package hive and Rick’s hive with them (both on drawn small cell comb). I am happy to say we just harvested our apiary’s first honey in 3 years from this yard! Rick’s hive gave us the honey and is now 6 mediums high with a booming population. That is after I harvested 15 frames of honey from the hive and placed a couple frames of eggs , a frame of nectar and another of pollen into a nuc that I took back home and and let them raise a queen that it now laying a beautiful pattern. Thanks, Rick! This is my best hive.

Before moving the package hive to the farm, I fed it 4 gallons of 1;1 syrup with Honey-B-Healthy and Vitamin-B-Healthy. It built up well and was a deep and 4 mediums when the queen died (have I mentioned how much I hate package bees?). There were about 20 emergency cells in the hive and I decided to let them raise their own queen. That saved me $30 and more importantly, broke the brood cycle from late June to late July, reducing the mite load (no queen=no brood=no place for mites to breed). After returning from the EAS meeting, I purchased 3 queens from Troy Hall and planned on making nucs from the package hive. Unfortunately, the hive lost a lot of strength while raising a new queen and I was only able to take 10 frames from the hive ( 1 of eggs, 1 larvae, 1 pollen 2 nectar rest empty but drawn comb) to make a 2 story nuc.  I then took yet  another 5 frames from Rick’s hive to start a 2nd nuc and brought both home so the bees would not return to the original hives. I added a 2nd story to Rick’s nuc and after 1 day of the nucs being queenless, introduced a Hall queen (in cages) to each hive. Three days later, the queens were released and are now building up for winter in our home apiary.

The Apiary at Honey Meadow Farm

IMG_1250

Panorama of orchard, gardens and apiary

The 2 nucs I purchased from Mike Palmer and the Russian nuc from Dan Conlon were hived at our home apiary. One of the Palmer nucs was hived on small cell and one on large cell. The large cell hive is out performing the small cell but I wonder if it is because it is in the shade during the hottest part of the day while the small cell hive is in the orchard and in direct afternoon sun. So much for my “big” study  of n=2 hives ;-). The Russian hive is also large cell and resides in the orchard. Speaking of the Russians…

The Russians – A great idea but…

hive placement

Palmer SC-1 on left, Russians near center in orchard and Palmer LC-1 and nucs on right

As expected, they were slow to build up once hived in a 10 frame deep (btw, all of my hives are 10 frame). I fed them immediately and they took about 2-3 gal of 1;1 before deciding not to bother. At this point there are 3 mediums on top of the deep with about 2 of supers filled of capped honey and the rest nectar. The queen has only laid in the deep. She is unmarked and I have not seen her since the day I put her in the hive. Various stages of brood, eggs and pollen are always present and there is a good population of bees given the size of the hive.

Now the but…These are the nastiest bees I have ever had! One had best be wearing protection if opening the hive. With smoke or without, these bees do NOT like me in their space! I normally wear a veil, t-shirt and long pants when doing my inspections. This hive has me with a bee jacket, veil and double nitrile gloves! I do look at this as my fault. Everyone else I know with Russians tells me how gentle they are. I believe I have a nasty queen and I should have replaced her 6 weeks ago but was too busy to make it down to Warm Colors. My bad as Dan is now out of Russian queens, so she is the matriarch until next spring. I have seen zero swarming behavior within the hive and there is always space for her to lay within the deep so she seems to be managing the hive well. Just leave her alone, thank you! Next chance I get to replace her, she’s gone.

The Palmer Nucs

LC-1

LC-1 and 3 of our 4 nucs

Mike’s bees are from Carniolan stock and his nucs are truly overwintered. They build up quickly and you have to be sure to stay on top of them so they do not swarm in early summer. I kept both of them here as I hived one on large cell (LC-1) and one on small cell (SC-1) and I wanted to see if there was a difference. Since the nucs came as large cell deeps, I had to use the large cell frames they came on in SC-1 hive but the rest of the foundation and comb is small cell. Oddly, even with feeding, it took them forever to draw out new foundation in either hive. So long, that I finally added a 2nd deep with drawn large cell comb to LC-1 because they were not drawing out any of the foundation in the mediums and I was afraid they would swarm. After taking about 3-4 gal of 1;1, both finally started to draw out their foundation and are doing well.

In comparison, LC-1 is doing better than SC-1. LC-1 is now 2 deeps and 3 mediums tall. I have harvested 9 frames of honey and I removed 2 frames of eggs, one of nectar and one of pollen to make a nuc for the 3rd Hall queen. I also removed 7 additional frames of “honey” and placed them in the bee freezer so I have reserve frames if one of the colonies gets light next winter. These were the early syrup frames and I wanted them out of the hive anyway. This hive gets early morning sun and is protected from the hot afternoon sun which may be why it is doing so well.

In comparison, SC-1 is in the orchard, is in shade during the early morning and in direct sun from about 10AM  until after 7PM. It has been hot and dry this summer so I wonder if that is having an effect. It is doing well and currently is 6 mediums tall. The queen is mainly laying in the bottom 3 with a bit of brood in 4. Most of supers 4-6 are now capped honey and nectar.

Both hives can occasionally be a bit fiesty but are usually gentle and easy to work. At this point, unless we have a good fall flow, I will not harvest any additional honey and will move what they have made around to balance out the hives and nucs for winter. We now have harvested about 60 pounds which is enough for us, some gifts and a few for sale.

Monitoring Mite Load

So you may have noticed there is very little about hive monitoring, mite load and treatments. Trust me, I am! In fact, I have moved to Mite Away Quick Strips (MAQS), an organically approved formic acid treatment. I will discuss this next week when the treatment is completed.

It is now mid-August and the mite load in your colonies is probably rapidly growing as your bee population starts to decrease a bit as the hives start raising your winter bees. If you have not been monitoring your mite load, DO IT NOW! Waiting until September or later in New England is too late. It’s not just the mites that matter but the fact they are a vector to passing other diseases that will infect your bees now as they get ready for winter. Knocking down your load to 1% or less now will make for much healthier bees in winter. Use a sugar or alcohol roll to get an accurate idea of your mite load. Screen bottom boards with sticky boards are not totally accurate and should be used mainly to determine overall trends.

Well, it’s finally pouring here right now. Naturally, my extractor is sitting unprotected outside the barn since the bees were enjoying cleaning up the residual honey after I harvested some frames yesterday. I guess I should have looked at that fancy weather station in the orchard last night…

I hope your bees are buzzin’ and you are enjoying fresh honey!


IMG_1203

One of Mike’s booming overwintered nucs!

Tuesday, May 10th at 4:30AM found me heading up 91N to Mike Palmer’s apiary to pick up 4 Carniolan nucs–2 for Andy and 2 for me. Saturday, May 14th at 2:00PM found me heading down 91S to Dan Conlon’s to pick up 2 Russian nucs, again 1 for Andy and 1 for me. That now brings my apiary to 4 colonies. We sort of look like the United Nations of apiaries with 1 Italian (package), 2 Carniolan and 1 Russian hives. Don’t tell “The Donald” or he may deport them or build a wall around my 10 acres. Actually, that may not be all that bad if it looks nice! One more hive is coming from my friend, Rick. He claims they are American bees and will not be deported.

That will be it for the season unless I start a couple of nucs in late June. That all depends on how the hives build up. The real problem is we live in the woods and I will soon have 5 colonies in an area that probably can only sustain 3. My original plan was to offer 2 hives to an organic farmer friend but another local beek beat me to it. Hopefully, I can place the Italians and the “Americans” in a garden down by the Connecticut River which should prove to be a prime spot and keep the rest here. If not, I still have the organic pasture in Sullivan, NH but bees have not done well there in the past.

The Past

P1000600

Hiving a 3lb package of bees

Those who have read this blog for the past 9 seasons know I have tried rather unsuccessfully to raise bees with as little intervention as possible. Early seasons were superb but the last few have been what I consider disastrous to my bees as they have not survived. Most surprising to me was the 2014 season where I entered the 2014-15 winter with  a very low mite count after treating with OAV, did a great job wrapping the hives and added ventilation with moisture boards based on a Master Beekeeper’s online plan only to watch my hives succumb to Nosema (I still think it had to do with adding “winter” patties from a major bee supplier causing the bees to need to relieve themselves but unable to due to bitter cold). At any rate, this has all made me wonder about just how possible it is to raise bees in my locale with minimal intervention.

To save newer readers from going back into the archives, please allow me to review what I have done in the past. First, I have been exclusively small cell in order to help reduce the mite population in medium hive bodies. I do believe small cell does help regardless of every published study saying it does not. None-the-less, in recent years I still had the logarithmic build up of mites in the fall that would overwhelm several of my colonies while others survived. I also did splits to break the brood cycle, did not treat for Nosema and fed as little  syrup as possible due to the change in pH it causes in the bee gut. All of this was in the “best practices” of the no treat camp and I felt I could develop bees that were genetically less susceptible to the diseases others treated for by breeding my survivors. The reality is, first you have to have survivors since, as you may have noticed, dead bees don’t reproduce. Still, I had success following this plan several years ago. It simply has not worked for my bees the last 3 or 4 years and it is time for me to reconsider what I am doing or stop.

The Future:

Step One – Feeding

P1000687

Russian hive with top feeder

Another glaring sign is neither my Westmoreland or Sullivan bees have produced a honey crop in about 4 years. In fact, they have barely made enough winter stores for themselves. This makes me wonder if I am not helping them build up fast enough in the Spring to take advantage of the early flow and splitting them too often for the Fall flow. This year, I immediately put 1:1 syrup on all of the colonies, this time using Honey-B-Healthy as a feeding stimulant and adding some additional amino acids via Amino-B-Booster. Since the nucs all are on deep frames, I decided to add a deep hive body to each colony. This means the bees need to draw out some fresh foundation as I have always used mediums to keep things simple. Feeding 1:1 helps provide the resources the bees need to do so and hopefully the additional amino acids will help nutritionally. I plan on feeding each of the colonies until they quit taking it.

Step Two – Small vs Large Cell

P1000068

Bees on small cell comb with 1 day old eggs

Without delving into the argument about which size is best (look at previous posts), the primary reason I used small cell was for mite reduction. For me, I took a big step in Fall, 2014 when I first used OAV to knock down the mite load in late summer and then again heading into Winter. That makes me wonder if there is still a need for me to use small cell since I am now using OAV for the same reason. Are larger bees better at overwintering or creating honey stores compared to my smaller bees? While I have my thoughts, I really do not know, so I hived one of the Carniolan nucs mixing fresh small cell foundation with the existing large cell frames the bees came on and placing a medium of  drawn out small cell frames on top.  The other Carniolan nuc was hived on all large cell frames in the deep with a medium of fresh large cell foundation above. Both will remain in the Westmoreland apiary and I’ll watch to see if there is any difference. Yes, I know this is too small of a sample size to make any definitive statement but it’s what I’ve got and I’m interested in seeing if they perform differently. Interestingly, the large cell hive has, as of May 20th,  refused to draw out any of the fresh foundation above the deep and is cramming everything into the bottom deep. If this continues, I will take the remaining large cell deep frames I have accumulated and create a 2nd deep hive body, put it above the lower deep and checkerboard the frames to prevent swarming. I’ll still leave the fresh foundation medium as the top super.

Note: All of the previously drawn out frames of comb, regardless of size, have spent a minimum of 2 weeks in my bee freezer before being used in a new hive. This is to help kill anything that may have been living on the frames in the previous hive. Not 100% fool proof but it certainly helps.

Step 3 – Treating for Varroa

P1000679

Organic blueberry blossoms

First and foremost, Gayla and I are very committed to managing our property organically. While not certified, I think it has been about 14 years since we used any inorganic pesticides or petroleum-based fertilizers anywhere on our Westmoreland homestead and Sullivan is about to be certified organic. Our gardens have been organic for the 25 years we have lived here. The blueberry, strawberry and raspberry beds plus the orchard we have established are now entering their 3rd season and all follow suit. This blog however, is about holistic beekeeping,not organic beekeeping and though I am not about to completely change my ways, I am acknowledging the fact that, in the past, I have not been considering the whole organism and now wonder about the value of some of the softer treatments. This is why I like OAV vaporization. The treatment has proven successful in Europe for decades. Oxalic acid exists in honey and in many of the foods we eat. It has been shown to have no affect on the queen, bees or larvae while being devastating to Varroa. The treatment is over within minutes and does not require me to leave strips in a hive for days. I have noticed several dead bees post treatment but I am wondering if they were actually on the material as it vaporized. Do I wish I did not have to use it? ABSOLUTELY! I also wish to win the lottery…

The Russian hive (placed in a large cell deep with drawn comb and a medium with fresh large cell foundation on top) should not require treatment. The queen is certified pure Russian, not a hybrid. They are resistant to Varroa, tracheal mites and American Foul Brood. Note, resistant not immune! I will certainly follow them using drop boards tho’ Dan says he has not had to treat for several years. I hope I can say the same.

Step 4 – Treating for Nosema

I am not a fan of prophylactic use of antibiotics. I do not take them this way and I do not feel right giving them to my bees. I have put a lot of thought into how to reduce my chances of N. apis or N. cerenae with nutrition playing a major role. After loosing so many colonies to Nosema during the 2014-15 winter, I’m leaning towards treating this Fall, though looking for something besides Fumigilan-B. I plan on attending the EAS annual meeting in July and hope to find an answer there. Please send comments if you have any ideas or let me know what you do. It’s very sad to open what was a booming hive going into winter and finding dead bees, frames of honey and a brown mess over everything.

Step 5- The Orchard and Pollinator Habitats

IMG_1279

Blueberry plants and some of the garden


My thought is the best way to defeat Nosema is by providing a variety of good forage throughout the season. That should also help with finally getting some honey! This is what first made me decide to plant the orchard and all of the various fruits. Now starting their 3rd season are 7 apple trees, 3 peach, 2 plum a pear and a pie cherry. The floor of the orchard is primarily dutch clover which also permeates our lawn. We also have 50+ cultivated blueberry plants, countless wild blueberries, 100 linear feet of raspberries and a strawberry bed. Our 78’x50′ veggie garden goes in this week. Dandelions abound…

IMG_1244

The orchard floor is a variety of pollinator plants–including white dutch clover–hopefully providing good forage throughout the season.

Providing pollen and nectar in the Spring is great but bees eat throughout the season so we are now planting varieties that will continue supporting all of the pollinators. So far we have added borage, an area of sweet clover, another of buckwheat, bee balm, numerous butterfly bushes, echinacea, sweet cicely, buttonbush, American cranberry (Bailey’s viburnam), a variety of wildflower seed, winter flame dogwood plus our normal perennials of lavender and numerous annuals.


Hopefully, this commitment will show the results that I expect and the bees in my care deserve.

OOPS! Gayla just handed me warm chocolate chip cookies! This ol’ boy does have his priorities. C’ya!

I hope your bees are buzzin’!